How to Dig, Divide and Store Dahlia Tubers
There’s a point in the dahlia season where the flowers slow down, the plants start looking tired and the whole patch begins to feel a little less glorious and a lot more “someone should probably deal with this”.
That’s your cue.
For us here in the Dandenong Ranges, dahlias usually start to die back around mid autumn. The exact timing changes a little each year depending on the season, but once the plants are clearly slowing down and the weather is starting to turn, I begin thinking about lifting, dividing and storing tubers.
This is the part of dahlia growing people tend to find intimidating, but it doesn’t need to be. There are a few key decisions to make and a lot of it comes down to your climate, your soil and what you actually want from your dahlias next season.

End of season: when dahlias start to die back
By mid autumn, our dahlias are usually starting to wind down.
The plants stop producing as strongly, the foliage starts to look tired and the season is clearly coming to an end. In colder areas, growers often wait until frost has blackened the foliage before digging. We don’t typically get heavy frost here, so I don’t wait for that cue.
There’s a lot of advice around cutting dahlias back and leaving them for a while before digging. Some growers do this and it works well for them.
Personally, I don’t cut mine back before digging.
Because we get a decent amount of rainfall, I find that cutting the stems back can leave them open to catching water. That moisture can travel down into the hollow stems and increase the risk of tubers rotting, especially when the weather is already cold and wet.
So in my conditions, I leave the plants standing until I’m ready to dig.
If you’re in a drier climate, cutting them back first may work perfectly well for you. It can make digging easier because there’s less plant material to deal with. But if you’re somewhere wet or your soil holds moisture, it’s worth being careful about leaving cut stems exposed before lifting.
As with most dahlia advice, the right answer depends on your conditions.
When I dig dahlia tubers
Here in the Dandenong Ranges, I generally start digging in mid to late May.
That timing works well for me because it gives the plants time to finish the season, but lets me get tubers out of the ground before winter becomes too cold and wet.
We don’t usually get the kind of hard frost that forces the issue, so I use the tail end of autumn as my window. Once the plants have slowed down and the weather is starting to turn, I begin working through the field in batches.
Depending on where you are, you may dig later than this. Or you may not need to dig at all.
Do you need to dig your dahlias?
Not everyone needs to lift their dahlia tubers every year.
Before you dig, ask yourself what you’re trying to achieve.
Do you want to multiply your stock?
If you want more plants next season, yes, you’ll need to dig and divide.
Digging allows you to separate the clump into individual tubers or smaller divisions, each with the potential to grow into a new plant. This is how you build numbers, share varieties or keep your collection going.
Are you just growing them in the garden to enjoy?
If you’re growing dahlias purely as garden plants and you’re not worried about multiplying stock, you may decide not to dig.
In milder climates with free-draining soil, many growers leave dahlias in the ground over winter and let them reshoot in spring.
Do you have wet winters, heavy frost or poor-draining soil?
If your winter is cold and wet or your soil holds moisture, lifting is usually the safer option.
Dahlia tubers don’t like sitting in cold, wet soil for months. In heavy or poorly draining soil, they’re more likely to rot over winter. If that sounds like your garden, digging and storing gives you more control.
Is your soil free-draining?
If your dahlias are growing in well-drained soil and your climate is mild enough, you don’t have to lift them if you don’t want to.
There’s no rule that says every home grower must dig every dahlia every year. It comes down to your soil, your climate and whether you want to divide.

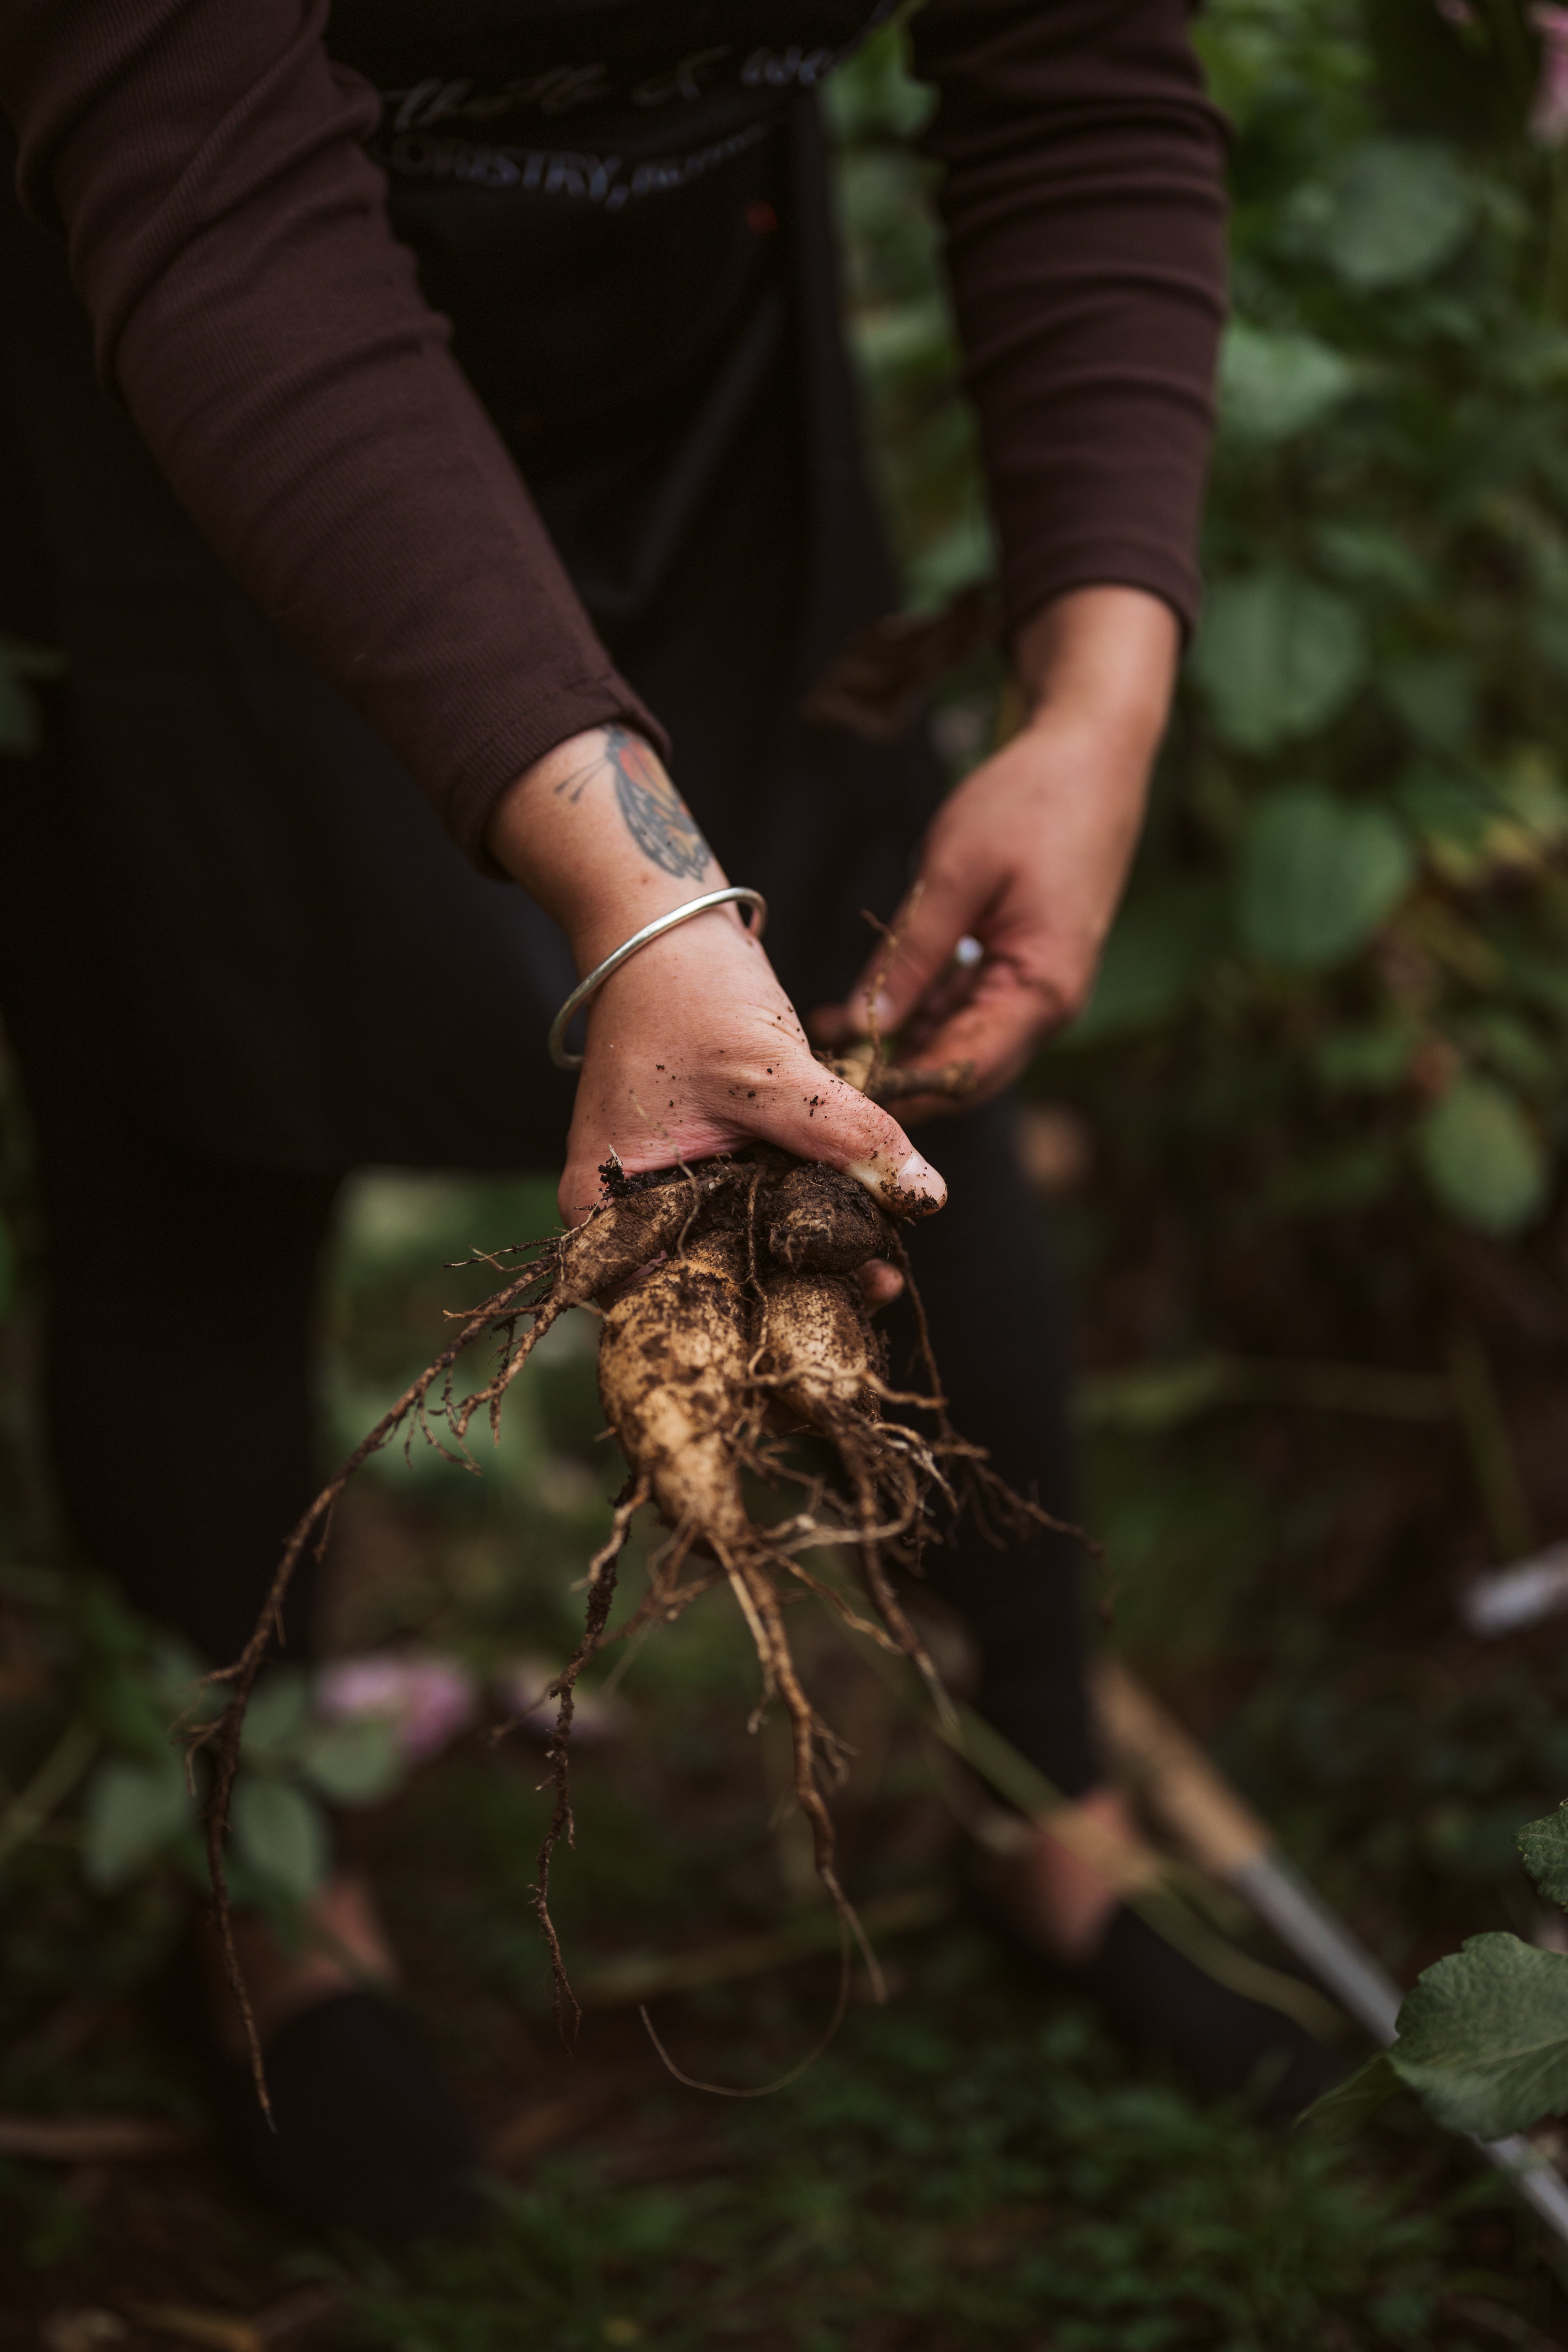
How I dig dahlia tubers
Growers have different preferences when it comes to digging tools. Some use a garden fork. I use a shovel.
I place the shovel about 30cm away from the main stem of the plant, dig down and gently lever the clump up from underneath. Once the soil has loosened enough, I pull the clump up by the main stem.
The main thing is to give the clump enough space. Dahlia tubers can spread out from the crown and it’s very easy to slice through them if you dig too close.
And if you do slice through a tuber, don’t panic.
It happens. All you need to do is cut the damaged section off cleanly, then leave the tuber somewhere dry and sunny for the cut surface to cure and form a skin before storage.
As long as the tuber still has a viable neck and eye (which I'll get to below), it can store perfectly well and reshoot next season. Dahlias are surprisingly resilient little plants.
A few tubers will get damaged during digging. That’s just part of it. Starting wide gives you the best chance of lifting the clump cleanly, but the occasional shovel casualty is not the end of the world.

Should you wash dahlia tubers after digging?
Once the clump is out of the ground, you need to decide whether to leave the soil on or wash it off.
Again, growers have different preferences.
My preference is to wash tubers as I dig.
I use the flat spray setting on the hose to remove soil and get into the nooks and crannies of the clump. I do this for a few reasons.
First, I want to see what I’m working with. Washing makes it much easier to spot any signs of rot, damage or disease early rather than finding a problem later in storage.
Second, our soil is fairly clay-heavy. If I leave too much of that soil caked around the tubers, it can hold moisture and create storage issues.
And third, washing makes dividing much easier. It’s hard to see eyes, necks, damage and structure properly when the whole clump is covered in mud.
That said, some growers prefer to leave soil on their tubers and store the whole clump unwashed. In drier soils and different climates, that can work well. It’s another one of those choices that depends on your conditions and your setup.
For me, washing is worth it.

Why I dig, wash and divide in one go
After digging and washing, I divide my tubers before storage.
This isn’t the only way to do it. Some growers store whole clumps over winter and divide in spring when the eyes are easier to see.
For me, dividing at digging time makes the most sense because of the numbers I’m working with.
It would be inefficient to dig everything, pack it away, then pull it all out again later to divide. So I work in batches: dig, wash, divide, then leave the divisions to cure slightly before storage.
Once divided, I let the tubers sit in the sun for a few hours so the cut surfaces can dry and harden off before they go into storage. I’m not trying to turn them into baked potatoes or dry them out completely. I just want any fresh cuts to seal over a little so they store better.

Tubers lightly air-drying before storage.
For a home grower with a smaller number of plants, you have more flexibility. You can divide in autumn if you feel confident, or store clumps whole and divide in spring when growth points are more obvious.
Both approaches can work. The important thing is understanding what makes a tuber viable before you start cutting.
Dahlia tuber anatomy: what you’re actually looking at
Before you divide a dahlia clump, it helps to understand the basic anatomy of a tuber.
There are four parts to know:
- the crown
- the eye or eyes
- the neck
- the body
If you’re looking at a dahlia clump for the first time, it can all look a bit chaotic. Once you know what each part does, it starts to make a lot more sense.

Anatomy of a dahlia
The crown 👑
The crown is the top part of the clump, where the tubers join onto the main stem.
This is the important bit. The crown is where the eyes form and without it a tuber (likely) won’t grow.
If you cut a tuber away from the crown completely, it may still look like a perfectly good tuber, but it won’t be viable because it has no point from which to sprout.
The eyes 👀
The eyes are the growing points. These are what will eventually produce the new shoot.
Sometimes they’re obvious. Sometimes they’re tiny. Sometimes they’re still dormant and you can’t clearly see them at all.
That’s what makes dividing feel tricky for a lot of people.
The good news is you don’t always need to see a visible eye to divide confidently. If each tuber division keeps part of the crown attached, you can usually be reasonably confident it has the potential to grow, even if the eye itself isn’t obvious yet.
The neck 🧣
The neck is the narrow section that joins the tuber body to the crown.
This part matters more than people realise. If the neck snaps, the tuber is no longer connected to the crown and won’t grow, even if the tuber body itself is perfectly healthy.
A tuber with a broken neck is not a viable division.
The body 🥔
The body is the swollen part of the tuber that stores energy for the plant.
This is the part most people focus on because it’s the most obvious. But the body alone is not enough. You can have a big, healthy-looking tuber body, but if it doesn’t have a neck, crown and viable eye, it won’t do anything.
To create a viable dahlia tuber, you need all of those parts working together.

What makes a viable dahlia tuber?
A viable tuber division needs:
- a healthy body to store energy
- an intact neck
- part of the crown
- a visible eye, or enough crown attached that an eye is likely present even if it’s dormant
This is why a smaller tuber can still be a perfectly good tuber, and why a larger tuber isn’t automatically better.
If a tuber has the right structure, it has what it needs to grow.
If it’s missing the crown or has a snapped neck, it doesn’t matter how big it is. (There are exceptions as always, but for the purpose of keeping things simple, this is the general rule to follow).
Tools I use for dividing dahlia tubers
Before I start dividing, I like to have everything set up properly.
You don’t need a huge amount of fancy gear (I'm a Felco gal myself), but sharp, clean tools make the whole process much easier. Dahlia clumps can be awkward, woody and tightly packed, so having a few different tools on hand helps.

Tools of the trade
These are the tools I use most:
Needle nose pruners
These do most of the detailed dividing work.
Needle nose pruners are great for getting into the smaller spaces between tubers and around the crown. They give you more control when you’re working in tight spots and trying to keep each tuber attached to the right piece of crown.
Bypass pruners
I use bypass pruners for thicker cuts, especially when I’m cutting off old stems or making a larger division through the middle of the crown.
They’re useful when the clump needs a stronger cut than the needle nose pruners can manage.
Loppers
Sometimes the crown or old stem is so woody that pruners just don’t cut it.
Literally.
That’s when I use loppers. Some varieties produce really thick, woody stems and you need the extra leverage to get through them cleanly. Looking at you, Lileah Caramel Rose.
Scissors
Scissors are mostly for tidying.
I use them to trim off loose feeder roots, old foliage and any little bits that are getting in the way. They’re not for the main dividing work, but they’re handy to have nearby.
Isopropyl alcohol spray
I keep isopropyl alcohol spray on hand to disinfect tools between clumps.
This is especially important if I come across any rot, damage or anything that looks suspicious. Cleaning tools between clumps helps reduce the chance of spreading problems through the rest of the stock.
Seedling trays with airflow
Once the tubers are divided, I sit them in seedling trays with good airflow so they can dry lightly before storage.
The goal isn’t to bake them or dry them out completely. I just want the cut surfaces to cure slightly and form a skin before they’re packed away.
Good airflow matters here. Tubers need to dry enough to store well, but not so much that they shrivel.
Clicker counter
I also use a clicker counter to keep track of tuber numbers as I’m dividing.
This is handy if you’re working through a lot of stock, or if you’ve got a million things going on in your head and still need to keep a running tally.
You could use your phone, a notebook or a spreadsheet, but a clicker counter is simple, muddy-hand friendly and doesn’t require unlocking a screen every three minutes.
How I divide dahlia tubers
Once the clump is washed and I can see what I’m working with, I start by tidying it up.
Every clump is a little different. Some almost fall apart in your hands. Others are a tight, woody, knotted mess and need a bit more persuasion.
My general process looks like this.

1. Trim off the feeder roots
After washing, I use scissors to trim off the loose feeder roots and any old bits of foliage.
I usually spin the clump around in my hand and snip away the fine roots so I can see the structure more clearly. This makes a big difference when you start dividing because there’s less material in the way.
You don’t need to remove every tiny root with surgical precision. The goal is simply to clean up the clump enough that you can see the tubers, necks and crown properly.

2. Prune the main stem back
Next, I prune the main stem back as close to the tuber body as I can.
The old stem can be thick and woody, especially on some varieties, so this is where bypass pruners or loppers can be useful. Removing the bulk of the stem makes the clump easier to handle and gives you better access to the crown.
3. Split through the main stem if needed
If the clump is tightly packed, I’ll often split down through the middle of the main stem or crown to open it up.
You can use secateurs for this and gently wiggle or lever the clump apart. The aim isn’t to hack randomly through the tubers. It’s to create a clean split so you can start seeing the individual sections more clearly.
Some clumps are easy. Some are a knotted ball and need a little negotiating.

4. Identify the eyes
Once the clump is opened up, I look for eyes around the crown.
The eyes are the growing points that will produce next season’s shoots. Sometimes they’re obvious little bumps. Sometimes they’re tiny. Sometimes they’re still dormant and hard to see.
This is why keeping part of the crown with each tuber matters. If you can’t clearly see an eye, but the tuber has a sound neck and a piece of crown attached, there’s a good chance it has the structure it needs to grow.
5. Cut diagonally to keep crown with each tuber
When I remove each tuber, I usually cut diagonally through the crown.
The goal is to make sure every tuber division includes:
- a body
- an intact neck
- a piece of crown
- an eye, or enough crown that an eye is likely present
This is the most important part of dividing.
A tuber body on its own won’t grow. A tuber with a snapped neck won’t grow. A tuber without crown won’t grow.
It doesn’t matter how big or healthy-looking the body is. It needs the whole structure.
6. Check each division as you go
As I divide, I check each tuber before keeping it.
I’m looking for firm tubers with a good neck, crown attached and no obvious rot or serious damage. If something is soft, rotten, badly damaged or missing the parts it needs to grow, I discard it.
Not every tuber on a clump is worth saving. That’s normal.
Some clumps produce lots of viable divisions. Others produce fewer. Variety, growing conditions and the way the clump formed all play a part.

7. Let the cut surfaces cure before storage
Once divided, I sit the tubers somewhere dry with good airflow for a few hours so the cut surfaces can cure slightly before storage.
I’m not trying to dry them out completely. I just want the fresh cuts to form a skin so they store better over winter.
For me, seedling trays work well because they hold the tubers neatly and allow airflow.

The main thing to remember
The most important thing is this:
A dahlia tuber is not viable just because it looks big and healthy.
To grow, it needs the full structure:
- crown
- eye
- neck
- body
And because the eyes are often dormant, the safest approach is to divide in a way that makes sure each tuber keeps part of the crown attached.
That one detail will save a lot of guesswork.
How I store dahlia tubers over winter
I’ve trialled a lot of storage methods over the years.
Cardboard boxes with soil. Paper bags with coco coir. Plastic tubs with vermiculite. Whole clumps. Individual divisions. The usual winter tuber experiments that make your shed look like a very niche science project.
What I’ve found is that the exact container or medium matters less than the basic conditions.
Dahlia tubers need to be stored somewhere:
- cool
- dark
- dry
- sheltered from rain
- protected from frost
- with enough airflow that they don’t sit wet and rot
This season, my method is divided tubers stored in paper bags with coco coir in the shed.
The shed is dark, dry and cool, and the paper bags allow some airflow while the coco coir helps keep moisture levels more stable. For my conditions, that’s a good balance. It keeps the tubers protected without sealing them into a damp little rot chamber, which is not the dream.
What storage medium should you use?
There are plenty of options for storing dahlia tubers.
You can use:
- coco coir
- clean soil
- vermiculite
- wood shavings
- paper bags
- cardboard boxes
- nursery pots
- breathable crates or trays
The best option depends on your climate, your storage space and how many tubers you’re dealing with.
If you’re somewhere dry and warm, you’ll probably need to check more often for desiccation. Tubers can shrivel if they dry out too much. In that case, a storage medium that holds a little moisture, like coco coir or clean soil, can help keep them from drying out completely.
If they’re starting to shrivel, a very light spritz of water of the storage medium can help. The key word there is light. You’re not watering them like a houseplant. You’re just preventing them from turning into raisins.
If you’re somewhere cold and wet, your bigger risk is usually rot. In that case, avoid storing them anywhere damp, sealed or exposed to rain. Airflow matters.
Check them through winter
Once tubers are packed away, I don’t just forget about them until spring.
I check them a few times over winter for signs of rot, pests or drying out. You don’t need to fuss over them constantly, but it’s worth having a look now and then so small problems don’t turn into a whole lost batch.
When checking, look for:
- soft or mushy tubers
- mould or rot
- pest damage
- excessive shrivelling
- condensation or too much moisture
- labels that are fading, falling off or generally trying to ruin your life
If one tuber is rotting, remove it before it affects the others.

Can you store whole dahlia clumps?
Yes, you can.
If space isn’t a concern and you don’t want to divide until spring, storing the clump whole can be a good option. Whole clumps often dry out more slowly because the mass of the clump helps protect the tubers.
This can be useful for home growers who only have a handful of plants and don’t need to divide everything straight away.
Spring dividing also has one advantage: the eyes are often easier to see once the tubers start waking up.
The downside is that whole clumps take up more space and can be messier to handle later. For me, because I’m dealing with larger numbers, it makes more sense to dig, wash, divide and store in batches.
But for a home grower, storing whole clumps can work perfectly well.
Can you leave clumps outside over winter?
Some growers have success leaving lifted clumps outside under a large tree or somewhere sheltered over winter.
That may work in the right conditions.
It would not be my first choice here.
Between our winter rain and the local possums and rabbits, leaving tuber clumps outside would be less “simple storage method” and more “free seasonal buffet”. So use common sense before trialling this one.
If your climate is mild, your soil drains well and your pest pressure is low, you may have more flexibility. If your winters are wet, your soil is heavy or every creature in the district treats your garden like a salad bar, choose a more protected setup.

The main thing with winter storage
Don’t get too caught up in making the storage method perfect.
The goal is simple: keep your tubers alive until spring.
They need to stay cool, dark, protected and not too wet or too dry.
That’s really the heart of it.
Use the materials you have, check them a few times over winter and adjust based on what you see. If they’re drying out, add a little moisture. If they’re too damp, increase airflow and remove anything soft or rotten.
Tuber storage is less about having the perfect system and more about paying attention.
A few bonus tips before you start
Size doesn’t matter as much as you think
Don’t be fooled into thinking bigger automatically means better.
Dahlia tubers come in all different shapes and sizes. Some are long and skinny, some are short and chunky, some are neat little things and some look like they belong in a Lovecraftian horror.
What matters is viability.
A tuber needs the right parts to produce a shoot: body, neck, crown and eye. A big tuber without those parts won’t grow. A smaller tuber with the right structure can grow perfectly well.
Anecdotally, I actually prefer smaller tubers in a lot of cases. I find they’re often easier to plant, easier to handle and they seem to produce better tuber numbers for me by the end of the season.
That doesn’t mean large tubers are bad. It just means size isn’t the thing I’d obsess over.
Viable matters more than massive.
Use what you have
You don’t need to go and buy a whole new setup to divide and store dahlia tubers.
Use what you’ve got.
Those million nursery pots tucked behind the shed? Perfect. Sort your tubers by cultivar, pop each variety into its own pot, fill with soil or your chosen storage medium and store them over winter.
Excess paper shopping bags from the weekly shop? Also useful. Add coco coir or another storage medium, pop the tubers in and write the variety name clearly on the bag.
Have a growing collection of cardboard boxes from online orders? Good. Put them to work.
Tuber storage doesn’t need to be pretty. It needs to be practical.
As long as your tubers are labelled, protected from frost, not sitting wet and not drying out completely, you’re on the right track.
What works for me might not work for you
This is the part I wish more people said clearly.
What works for me here in the Dandenong Ranges might not be exactly what works for you.
Your climate might be drier. Your soil might drain better. Your winters might be harsher. You might be storing five tubers in a laundry cupboard, not hundreds of divisions in trays.
That’s fine.
Take what works. Scrap what doesn’t. Adjust for your conditions.
There isn’t one perfect way to dig, divide and store dahlias. There are principles that matter, like keeping viable tubers, preventing rot, avoiding frost damage and checking them through winter. But the exact method can vary.
The goal isn’t to do it exactly like someone else.
The goal is to find a system that keeps your tubers healthy until spring.
Final thoughts
I hope this has been helpful.
Just remember, take what you need and leave the rest.
Part of the beauty of gardening is learning what works best for you, your plants and your conditions. Your climate, soil, storage space, pest pressure and patience levels will all shape the way you grow dahlias.
There’s no single perfect method.
Digging, dividing and storing tubers is something you’ll get better at with practice. You’ll learn which varieties store well for you, which ones need a little more care and which methods suit the way you actually garden.
It’s all an experiment.
Enjoy it!
Sam x
Planning your dahlia patch?
Our dahlia tubers are grown in the Dandenong Ranges, Victoria, then lifted, divided and checked by hand before release.
If you’d like first access when our next dahlia tuber pre-sale opens, join the Dahlia Tuber Waitlist.
Join the Dahlia Tuber Waitlist
You can also browse the dahlia tuber collection to see the varieties planned for release.
Want more dahlia growing notes?
I’ve pulled together a Dahlia Growing Resources page with practical guides on choosing, growing, digging, dividing and storing dahlias.
It’s a good place to start if you’re building your wishlist, planning your patch or trying to work out what to do with your tubers at the end of the season.
